

Sonar505
-
Posts
31 -
Joined
-
Last visited
-
Days Won
2
Sonar505's Achievements
")
Newbie (1/14)
45
Reputation
-
 Christopher reacted to a post in a topic:
How to build a easy and inexpensive display stand
Christopher reacted to a post in a topic:
How to build a easy and inexpensive display stand
-
 Sonar505 reacted to a post in a topic:
Wood Mods I have made
Sonar505 reacted to a post in a topic:
Wood Mods I have made
-
Sonar505 reacted to a post in a topic:
Wood Mods I have made
-
Sonar505 reacted to a post in a topic:
Wood Mods I have made
-
gadget reacted to a post in a topic:
Wood Mods I have made
-
gadget reacted to a post in a topic:
How to build a easy and inexpensive display stand
-
It has been awhile since I last posted. So I thought I would share with you what I have been up to since then. There have been quite a few in that time so please bear with me. I will try and give descriptions when I can. Some you may have seen before but the majority I have never posted Here. First are some of the original mods I made. Some are in my personal collection and some I have sold. The next ones have all been sold off. They are a mix of Squonkers (Single and Dual Battery) Mechanicals, Unregulated, and Regulated. Plus Non Squonkers in (Single and Dual Battery) Mechanicals, Unregulated, and Regulated. Here is the latest batch of Mechanical Squonkers I just Sold off. pics to show size difference between mechanicals and unregulated with mosfet to protect switch. Here are some individual shots to give you an idea of what they look like inside. also some one offs in which I experiment with different techniques. Thanks for viewing . If there are any of these that you would like to see closeups on please feel free to ask. As always all Comments, Questions and or Critiques are very much appeciated.
-
mattythornton reacted to a post in a topic:
How to build a easy and inexpensive display stand
-

How to build a easy and inexpensive display stand
Sonar505 replied to Sonar505's topic in General Vaping Discussion
Thanks for the nice comments very much appreciated. @mattythornton as for the level of my vape collection. Mrs. long gone and have been vaping since 2011. So watch out it tends to sneak up on you. You may one day find out it has turned into a hobby. -
Tam reacted to a post in a topic:
How to build a easy and inexpensive display stand
-
gadget reacted to a post in a topic:
Vape display? Let's see I need some ideas
-
gadget reacted to a post in a topic:
How to build a easy and inexpensive display stand
-
Walt reacted to a post in a topic:
Vape display? Let's see I need some ideas
-
If you are anything like me you will find that over time your collection of vaping stuff will seem to magically grow by leaps and bounds. Especially if you start to DIY your own juice. And your patience with sorting through jumbled mess in a shoe box will quickly wear thin. With this in mind I came up with a no frills design that anyone can make cheaply (under $10) and very quickly but will allow you to expand as needed. Here Is what we are making. One for Juice bottles and One for Atomizers. First step is deciding where you are going to place it. Whether in a cabinet, cubbie hole, a desk or table top then measure and write down height,width, and length. Now we drive to Home Depot for the 2 types of wood needed. I already had the materials at home left over from other projects so I just made both. You can do the same or just one or the other. First the juice bottle one. You need a 2"x2"x8 foot board (although they actually measure 1 1/2" wide not sure why?) Cost is around $2 Now you decide if you want Home Depot to cut your wood to size which they will they just won't guarantee precision cuts. Based off of the measurements you took before, If your shelves are going to be less than 36" long then you need 3 of each size if more than 36" then you need 4 of each 2" 4" 6" 8" If more than 4 shelves high than go up on each piece by 2" This will form your bases. Next look for this cart somewhere in the lumber section. Look at the 1 1/2" size pieces (poplar is the cheapest) and grab the amount for the number of shelves you plan to make in either the precut sizes or have them cut down to the size needed by Home Depot. For my 2 units I used (1) 2x2x8 and (4) 1/4x1 1/2x48 hobby boards. The bottle space was 34" long so I needed 3 bases up to 8" high and 4 shelf's 34" long. I used (3) of the remaining 14" hobby boards on the atomizer shelf and cut (2) 6" high bases leaving me with a 10" piece of 2x2x8. Once back home find a flat place to work and grab any type of glue and start assembling the bases. Starting with the largest 2x2 piece lay it on it's side add glue to one side of next smaller size and stack it on top like so. While glue is still wet adjust the pieces so cut edge and sides line up as even as possible. Continue on until all bases are glued. Allow glue to dry for a few minutes. Place bases with cut edge down where you planned for with 3rd one in the middle or 3rd & 4th evenly spaced for longer shelf's. Then place hobby boards on other cut edge like so For the atomizer one there is an extra step. Grab a pencil, ruler, and some atomizers. Lay them like so. This will help you get a feel for how many will fit on your shelf and what spacing is needed between them. Then make 3/4 of an inch mark on both edges of shelf and using another shelf as straight edge draw a line down the center. Now transfer your spacing marks to that line. Now grab a drill and a bit that is slightly larger than your 510 connector on the bottom of the Atomizer (I used 9/32) and drill at your marks you can either drill all the way through or stop right before test with an atomizer to make sure base lays flat against shelf. Do the same for other shelves. Once you are done with that I recommend you glue shelves to bases. And were done! As I said at first no frills but very useful. Now you get to decide what else you could use this shelf for or maybe sand and stain or paint them. After finding more attys (I swear they are reproducing by themselves) I added a couple of more shelves And here is one way that I decided to finish it. As for me after looking at the first picture I really need to get my bottle labels under control and now I know exactly where to place them on the bottle for optimum viewing. Thanks for reading. As always all comments, critiques, and or questions are much appreciated.
-
Here is what I made to control my collection of Atties, Driptips, and spare parts. I Thought I had already posted my how to build the base for this but apparently not so will remedy that soon. This is one way of finishing it off.
-
iQuit reacted to a post in a topic:
A Battery Charging,Testing, and Storing Holder
-
jasonculp reacted to a post in a topic:
A Battery Charging,Testing, and Storing Holder
-
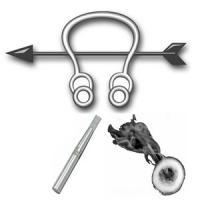
Every Since I started Vaping and making mods I would keep reminding myself that there had to be a better way of handling my growing collection of Batteries. I tried lining them up in a cigar box all nice and neat only to knock them back into a jumbled mess the first time I reached for one. Or go to swap out the battery in a mod and forget which hand I had the charged one in ( I killed way to many brain cells when I was Younger ). So while planing this I knew I wanted it to incorporate my existing charger (works great) keep my batteries organized, and be able to test various sizes of batteries. Then I remembered "THE DRAWER" You know the one (I can't be the only one) It's where you throw all the AAA,AA,C,etc. rechargeable and non batteries that you have ever owned and have no idea which are good or bad. So I had to find a meter that would read down to 1.2 volts (AAA) (most will not show below 2.5 volts). And So this is what I came up with and was finally able to get organized and reigning in "THE DRAWER" was a nice added benefit. And in case you;were curious what the 2 bolts next to the display were for It's for testiing 9 volt batteries.(My younger brother will no longer let me test them my preferred method which was to goad him into sticking the leads on his tongue ). Thank you for viewing as always all questions,critiques, and or comments are much appreciated.
-
Hello again. Just Sharing my latest build. And requesting a little help from my fellow vapers. This is the type of mod where I am completely unsure If people will like it or Hate it or both. So I would very much appreciate as much feedback as possible. Even if you think its the gaudiest POS out there I will not mind just want some comments please. I started out wanting a 18350 Squonker with wood and copper materials. About half way thru I had to rethink my plans. I originally wanted to use one of the pennys as my switch and center the 510 connector but I did not make the box just quite tall or wide enough. So plan B was make a mechanical top switch, move 510 over and add a button for sqounking. Since I had already drilled the holes I left the penny's as a design element.Then drill out the Pos. pin and enlarge the airholes on my atomizer and Bobsyouruncle. Been testing it out for the last few days and everything working great. No leaks,,feeds and drains great. Very Light weight and feels wonderful in Hand The Pictures that follow were taken in Various Light Sources. With some in Hand and next to a 18650,Chana 30w, and the 18500 squonker I made last month. All for size comparison. . Thank you very much for viewing and once again all Comments, Critiques, and or Questions are Very much appreciated.
-
Thank you all for the very nice comments. And shen_long86 It really is not that hard to do. Look for my tutorial for building the wood box. As for the rest if you run into any problems or questions feel free to ask.
-
Until now the bottom feeders I had made used a catch cup. So I was limited to the size of the atomizer I was able to fit on top. With this in mind I set about designing a new mod. I knew I wanted it made of Wood (No Surprise If you have seen my others) and I wanted it to be of a compatible size to an Igo W atomizer I already had. So I drilled out the positive pin on the Igo W and made a glass top cap for it (wanted to be able to see how much I was squonking). I also wanted it to be mechanical with a wooden switch. This is what I came up with. It was very hard to photography the true colors of the mod so I am showing 2 versions 1 with flash and 1 without. Front Front With Flash Back Back With Flash Top Inside And to give a size perspective. In hand In hand With Flash Front With Chana 30W and 18650 Battery. Side With Chana 30W and 18650 Battery. Thank you for Viewing. As Always all Questions, Comments and or Critiques are very much appreciated.
-
Finally decided to organize My DIY Flavor Bottles
Sonar505 posted a topic in DIY e Liquid Discussion
Recently thanks to generous recipe posters I discovered how easy FlavourArt flavors are to work with. So placed an order for 33 FA flavor samples from eliquid mart then after trying them and finding more recipes I wanted to try. Placed and received a 2nd order of 35 bottles. For me It became a pain in the *** to try and find the individual flavor. Pick up read no!,Pick up read No!, etc, or worse take all out the box and play dominoes with them while on the table. I decided there had to be a better way and set out to make one. I don't know if you are anything like me but this is what my DIY shelf looked like before. And this is what it looks like now! I made It to accommodate the FA flavors I have now and allow for future growth. I was also able to put them in Alphabetical order and read the flavor name for easy location. (Added benefit Lorann's 1 dram bottles also fit) Over the past few years I had also accumulated quite a few wizard lab samples (which are even better at mimicking dominoes). And since I plan to continue to use them either individually or in combination with FA. I decided to make one for them. Here is how it looks like now when I mix a eliquid recipe. I have the wide mouth jars for my NIC,VG, PG, and Premixed Base. (easier to get the last little bit and no tipping). And here is a pic of the final results. Both racks are hinged (makes them more stable when opened) and have a latch to keep closed when put away. Thanks for reading. Hope you like. -
Not sure if you are aware. But if you wrap your new syringe with clear box or packing tape then the markings don't fade away.
-
You might consider getting a thick leather pouch/holster maybe with a belt clip. Something that wraps around both the tank and battery and supports both. Some people use maglight holsters. Do a google search for ecig holsters and check images for ideas.
-
Total noob please forgive the 100 questions!
Sonar505 replied to Mikaihh's topic in New Vapers Forum
Looks like a nice kit CE4 rebuildables are easy to fill and use. Plus easy to take apart for cleaning. I don't know if you realized that this company is in china. While they sell the kit at a nice price. It can take a long time to get to you. I have never ordered from this particular company so can't say what kind of customer service you can expect. If somethings wrong with it you may have problems getting it resolved. That is why the majority of vapers tend to order from a U.S. Based shop. I see that you live in Arizona . So a place I can recommend to you is High Desert Vapes. They have some similarly priced kits. maybe not in those colors. But they are out of New Mexico. So you will get them very quickly. They have a very good reputation for customer service. -
How To Build A Easy & Inexpensive 3.7 V Wood Mod (Image Heavy)
Sonar505 replied to Sonar505's topic in Modders Forum
Rorie and EvilM0dder thanks for the nice comments. Sorry I had not responded sooner. If you or anyone else has some questions please feel free. I will try to monitor the thread more often. -
How to maintain & rebuild a Vivi-Mini Nova and CE4
Sonar505 replied to Sonar505's topic in General Vaping Discussion
Your Welcome Uma. Really glad you're around this forum It seems you are one of the few who posts comments on anything I post So I thank you back for that. -
The Vivi-Mini Nova's and the CE4 rebuildables are one the stable vaping items that always seem to generate quite a bit of discussion. Whether you Love them or hate them almost everyone seems to have at least tried them. Even vapors who tend to prefer the higher end stuff usually reveal that they have a few for when they go out and about and don't want to take any chances with their more expensive equipment. They have been out for quite a while now and have been through a few changes. But the look and ease of use have not changed. There have also been many clones made that can sometimes be hit or miss. Quite a few people have contributed to making them better trying different wick and coil combinations until they found what works for them. They have also been wiling to share their findings with the vaping community and for that I thank them. Here is what they look like for those few that have not used or seen one. When you first buy one you might be amazed at the ease of use. Can be filled straight from the bottle (no syringes needed), they produce a lot of vapor, are super easy to disassemble and clean, And have very good flavor , for those that say the flavor is muted there are simple changes to improve that also. For those that don't like rebuilding you have that option also they sell replaceable heads in different resistance that can be bought very cheaply,screwed on refilled and go. If you like working with your hands then they can easily be rebuilt for even cheaper. It's your choice. You may already have your routine down on how you handle your Vivi Nova's. So what follows isn't for everyone its for someone who has been using one for a while now and doesn't want to spend money on more heads or someone who wants to coax more flavor out of them. They might not know what the term dry burn means or even that you could rebuild them. This is what works for me. I have broken it down into two parts. First is after you have already rebuilt the head and want to replace the wick either because it will no longer clean or you want to change flavors. The 2nd Part is how to recoil and rebuild the head to set it up for easy wick changes. So now you don't have to wait for the wick to dry before refilling. As I might have mentioned before there are quite a few clones and more coming. This is also how you dry burn to clean when you first get these , except you can leave the silica wick in. it won't burn the red hot coil will turn it from black back to white. Part 2 I hope that I answered more questions than I created. But if you do have any please post them. Thank you for taking the time to read/view this.