


MRSpivey
-
Posts
80 -
Joined
-
Last visited
-
Days Won
2
Posts posted by MRSpivey
-
-
Hello back at you and welcome! Well, to answer your question it’s kind of difficult since I DIY. I guess the best way to answer is that I prefer fruit/tropical as well as bakery/pastery. I've been Vaping since November 28, 2014. I love it!!! I'm one of those who went way beyond just doing it to quit smoking (or using tobacco in general). I plunged deeply into the rabbit hole! LOL
-
Parts: eBay seller ati_store
Wood Enclosure: Absolute-Wood.com
3D printed parts (design and printed): Absolute-Wood.com
Stabwood: Kali Kustom Blocks (Facebook)
The reason I say this is I'm building a DNA250 Stabwood Squonker (LiPo) and that's the track I took. You could probably save some bucks by getting an N1 Enclosure set up for a DNA250C and do a cutout for the bottle. -
If the Nic level is over 6mg I would say that's your harshness issue. You can reuse the wire already in the RDA if you don't have anything else right now. If you don't have a coil tool you can use a CLEANED drill bit (1/8" is what I use to use). First take your wicking out and glow your coils via pulsing the fire button to burn off the gunk. Let cool then remove. Rewrap them on the shank of the cleaned drill bit (let the wires be equally spaced apart a little). Remount each coil in the RDA and with a small screwdriver work on the spacing and adjust position with the drill bit. Once you're done positioning and twerking spacing remove the drill bit and repeat glowing of the coils. After cooling, rewick as I mentioned earlier.
-
What Nic level?
What wire do you have?
Coiling tools?
-
Do you have any advice when I recoil my atomiser which is most probably going to be the next few days? What's the best way to coil my atomiser?
What are you running? -
I use high VG (>=80%) and, as you may have noticed, I prefer spaced coils as well.
-
It looks a little loose and I wouldn't have that much bend so quick right after the coil. Your wick tightness should be just short of moving/bending your coils as you pull it through. In fact, you may need to put a little counter tug with your other hand on the opposite side as you pull to "stretch" the cotton a little. Once through, you should do a light combing/fluffing of the tails before you bend and place them. Juice them up really really well and let them sit a little so the juice saturates completely through. Juice a little more and pulse fire a few times. Juice a little more and you should be ready to go. You will probably need to drip juice around every five draws. Try not to chain vape so as to give the juice time to resaturate to the middle of the coil. As a side note, I usually go with larger ID coils (3mm and larger) as this also helps with not getting dry hits and greater surface area in contact with the wicking for more vapor production.

-
Can you take some pics of how you have it wicked and post them? What are you using for wicking material?
-
Welcome!
-
First, WELCOME! Second, have you used steam-engine.org to guide you in building coils? What batteries are you using? Batteries in series or parallel? Single or dual coil (it appears to be dual but just to verify)?
-
He has been reported to U.S. Postal Inspection Service and the Vermont State Troopers for Fraud/Scam/Petty Theft.
-
Sorry you got burned so bad, [mention=38703]MRSpivey[/mention] What can the FB Vape Court do for you other than to ban this guy?
That's about it. He can be listed on a publicly viewable list of scammers so people can check to see if someone they are about to deal with is listed. Just helps others from getting burned. -
If you happen to run across Chris M Dunster on Facebook be cautious. I have him in Facebook Vape Court. Here's my side: https://drive.google.com/drive/folders/1xLYrjKBfizf3ZsmOM-MARxlxXmqQW4mi?usp=sharing
-
Another note of interest, when the new battery gets put in put something (like a thin piece of hard plastic) between the 510 positive pin connection and the bottom of the battery (it can be taped to the battery). It looks like there is a potential for the 510 positive (which will stick out more with an Atomizer on the Mod) to cause abrasive or puncture damage to the bottom of the battery over time.
-
Whom ever installs it will need to cut the plug off the end of the new battery (one wire at a time), strip and tin one wire with solder, remove old battery’s corresponding wire from the board, solder the new battery wire to the board. Repeat process with other wire. Whom ever does it needs to be very careful not to short the new battery wires or short the positive (red) wire to the board screw hole next to the board positive connection, which is electrically tied/connected to the ground (black wire connection).
That is one reason I made a suggestion to just cut the wires of the old battery (as close as possible to the battery) and just buy a connector to solder onto the wires. Then it’s an easy soldering and connecting process (and any possible future disconnecting). The only possible issue would be having enough space to put the wires and connectors. -
Just to double check, is this the right battery, and ok. I lost it during moving and recently found it. It will never get this dead again lol
That’s the one I was looking at. -
Another thing is that you could get a plug connector that way it’s just a plug-in as opposed to cutting the plug off of the new battery and soldering it to the board. Also, if you’re going to let it sit for a long period of time before it is charged again for use you should only drain it down to about 3.8 V per cell.
-
You or someone will need to know how to solder.
-
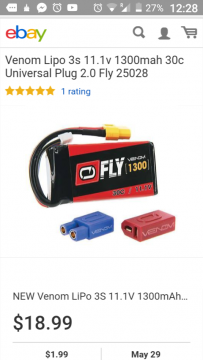
Sweet. I would go with a Venom Fly 1,300 mAh 3s 30C. It has a lifetime warranty and on Ebay it's $21 from omnimodels (539,236)
It's dimensions are 2.6" x 1.3" x 0.8"
Your pack is 2.6" x 1.42" x 0.83" -
Where are you located geographicly?
-
FULLymax
1200mAh 11.1v 13.32wh
6197*0303
Sorry for bad pic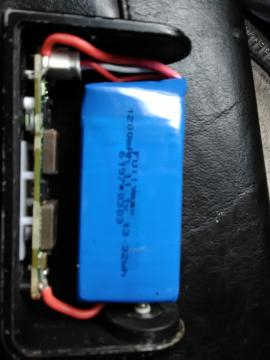
NP -
-
-
Welcome!!!


Im back!
in General Vaping Discussion
Posted
I mix my own. I typically get my supplies from Heartland and Bull City.